How to Draw on Procreate
Want to learn how to use Procreate to draw on your iPad? New to Procreate or want to learn time-saving tips and tricks? In this video you’ll learn all the basics, tips, tricks, and everything you need to get you drawing as quickly as possible, without overwhelming you with information. Learn which hardware to get, the best size canvas to use, colors, layers, alpha lock and clipping masks, select and transform, drawing guides, adjustments, and more.
Contents
Intro to Procreate
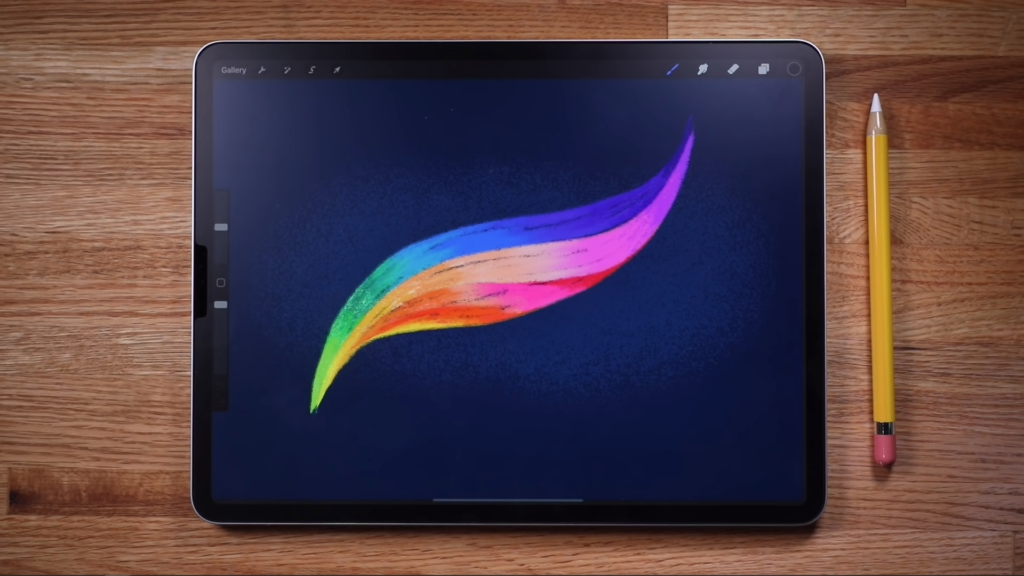
Procreate is an iPad app that lets you draw anytime, anywhere, with the world of art media literally at your fingertips.Procreate is a powerful and intuitive painting and drawing app for the iPad and can be used to create extremely detailed and advanced artwork, but it is also perfect for beginners because it’s so intuitive to use.
Procreate enables you to have every type of drawing and painting medium and limitless colors anytime, anywhere. It’s perfect for helping you establish a daily art making practice.
Quick Jump to Youtube Video Timestamps
Hardware for Procreate
Let’s jump right in and learn about the best hardware to use with Procreate.
The dream team for using Procreate is the iPad Pro and Apple Pencil.
You can draw in Procreate with your finger or a third party stylus, but no other tool matches the responsiveness and control of the Apple Pencil. My Apple Pencil looks a little special because I put stickers on them. I got my Apple Pencil decals from dbrand.com.
Which iPad for Procreate?
As of the recording of the tutorial, the Apple pencil only works with the current iPad Pro released in late 2018, as well as all previous models of iPad pro, and the 9.7 inch iPad released in early 2018. I recommend getting as large of a screen size as you can afford. (See this page for a current list of iPads that support the Apple Pencil.) I use the 12.9 inch iPad Pro and I love having a large area to work on. If you have less of a budget to work with, the 9.7 inch iPad is a great option because it’s the only non-Pro iPad that works with the Apple pencil.
I also highly recommend getting a matte screen protector for your iPad. The glass screen of the iPad can feel a little sticky or slippery, so a matte screen protector is going to give you a nice smooth feeling when you draw.
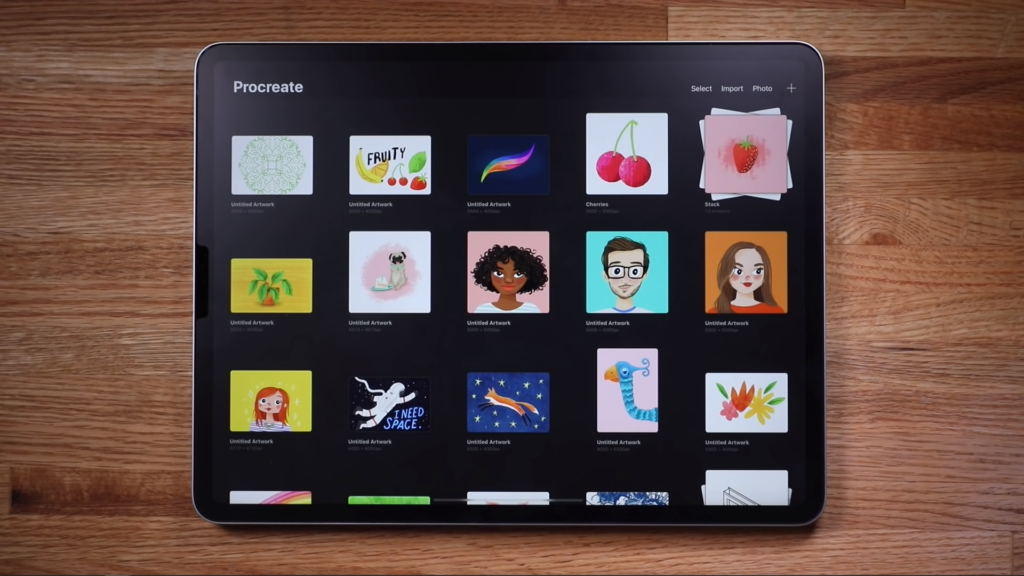
Procreate Gallery View
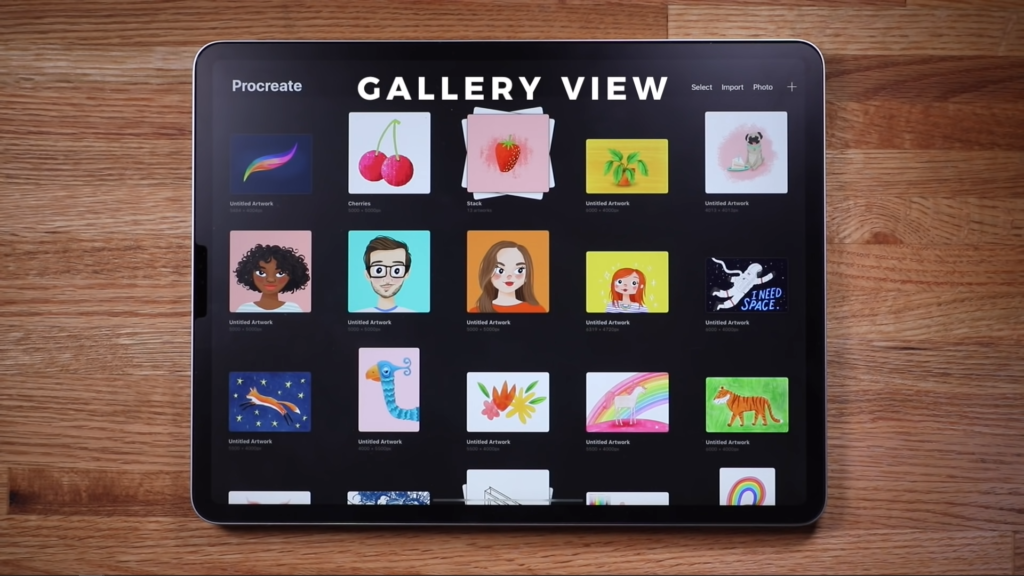
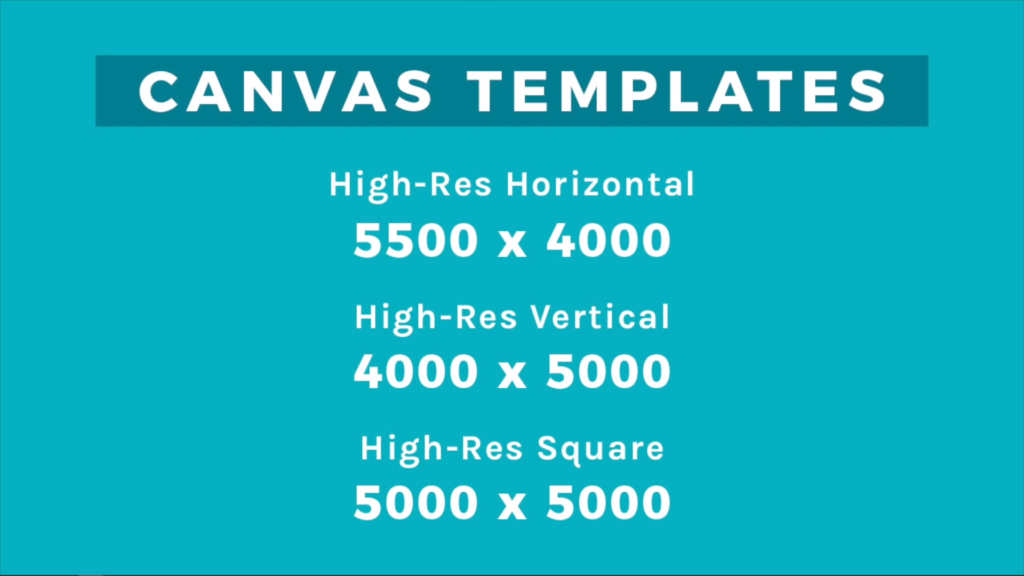
The gallery view is the first thing you’ll see when you open procreate. Here you can browse and open all of your artwork as well as start new pieces. Tap the plus sign to start a new file. You’ll see a variety of canvas size templates and you can easily create your own.
I like to use a high-resolution canvas when I work in Procreate. It gives me the option to print my work later on, plus a lot of the brushes I use are optimized for a high-resolution canvas.
Procreate Brushes
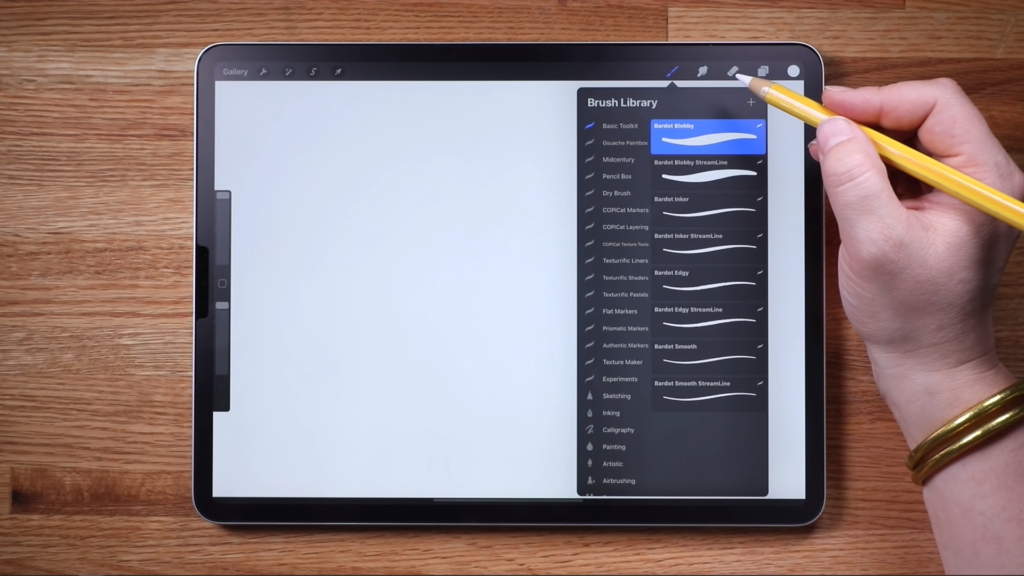
The first thing we’ll do is take a look at the brushes.
Tap the paintbrush in the upper right to access the brushes panel.
Procreate comes with a variety of pre-installed brushes covering a range of mediums and styles, but the real magic of Procreate is that you can install or even create your own custom brushes. If you tap on a brush you’ll see that each brush has dozens of settings that manipulate a texture and a shape. You don’t need to get to know these settings right now, but just know that they exist.
Tap the arrow to exit the brush settings here.
In my brush list, I’ve got all the brushes I’ve ever created sorted into sets. To start off, play around with the different brushes. Each brush has different abilities so experiment with different levels of pressure, the speed of your strokes, as well as the tilt of your Apple Pencil to see what different effect each brush can produce. The sliders on the Left allow you to control brush size, and Opacity.
Undo / Redo / Clear / Eraser

You can pinch and spread to zoom in or out and rotate your canvas. Do a quick pinch to have the canvas go back to filling the screen. If you make a mark you want to undo simply tap with two fingers anywhere on the canvas.
Tap with two fingers and hold to undo multiple.
Tap with three fingers to redo.
Tap and hold with three fingers to redo multiple.
Use three fingers to “scrub” off the screen and clear all.
Let’s take a look at the eraser tool.
I’m going to color in a portion of the screen then select the eraser, which is right here. The cool thing about it is you can use any of your brushes as an eraser. Let me undo that. If I look at my brush, I can see that I’m using this one. Now if I tap and hold the eraser, it will automatically select that brush to use as an eraser. Now I can erase and have my eraser marks match the brushes and it will look seamless.
Working with Color
Let’s talk about my favorite thing in the world: color!
Tap the circle in the upper right and you will see the color picker. Use the outer ring to select your hue, and use the inner disc to fine-tune the lightness darkness or saturation of the color.
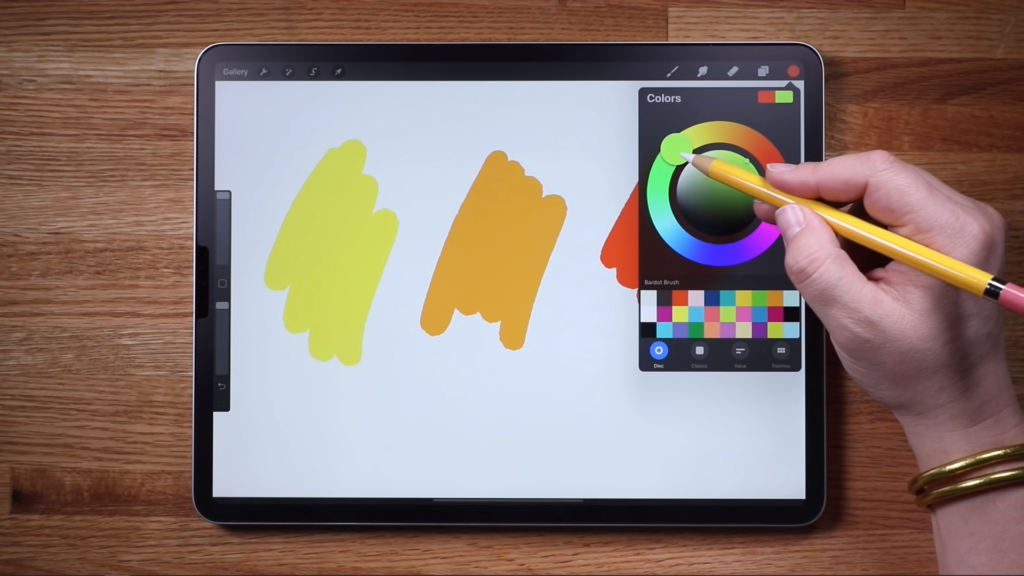
Let’s lay down a few colors.
You can quick select a color by tapping and holding on the screen to invoke the eyedropper. It lets you easily select a color that’s already on the canvas.
Let’s save these colors we’ve made. Open the color panel and tap “Palettes”. Tap the plus sign to create a new palette – make sure it’s set to default. Tap back over to disc and we have a new empty color palette to fill up. Select the yellow. To save a color, just tap a square in the palette. Let’s add all these colors to the palette. You can reorder the colors. Just tap, hold, and drag. To delete a color, tap & hold, then tap “delete”.
For more on color palettes check out my full tutorial.
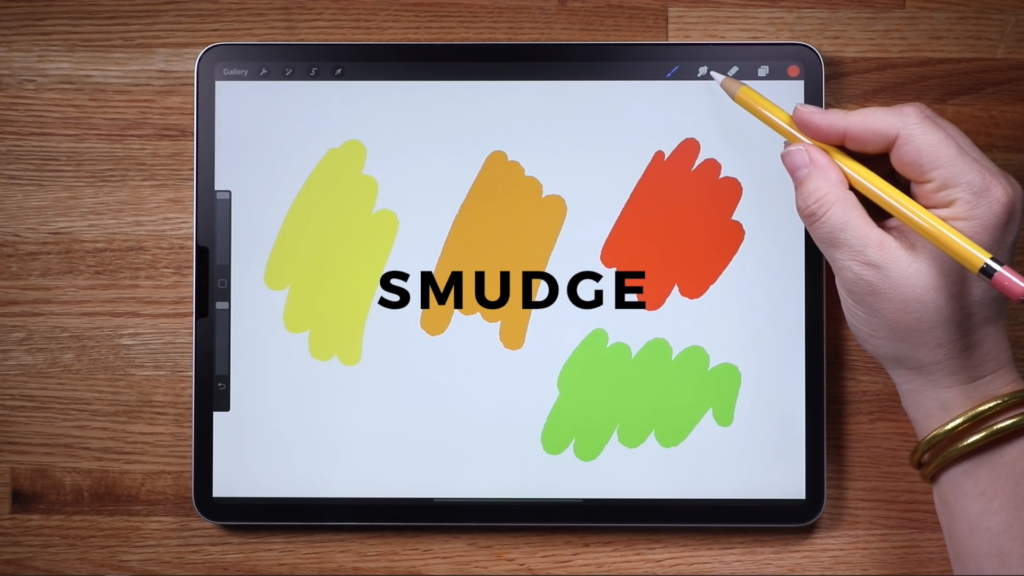
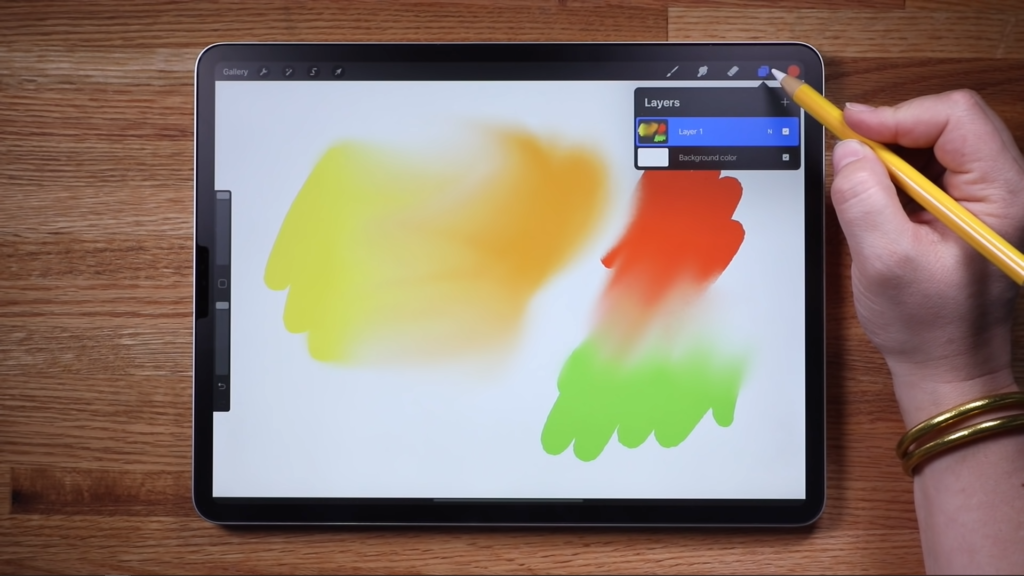
Procreate Smudge Tool
This little finger icon is the smudge tool. It can smudge, smear or soften, or combine brush strokes and colors. The opacity slider controls the strength of the smudging. This can be useful for things like creating smooth color transitions in your drawings.
Procreate Layers
Moving on to layers. Layers are very powerful, and one of the most useful elements of Procreate, and are packed with a ton of amazing features. Tap these two squares in the upper right to open the layers panel. At the bottom is the background color. By default it is white, but tap it to select any color as your background. Let’s stick to white. Double tap the color disc near white to automatically select a pure white value. This double tap feature works in nine points on the color wheel and can help you find the ideal color values.
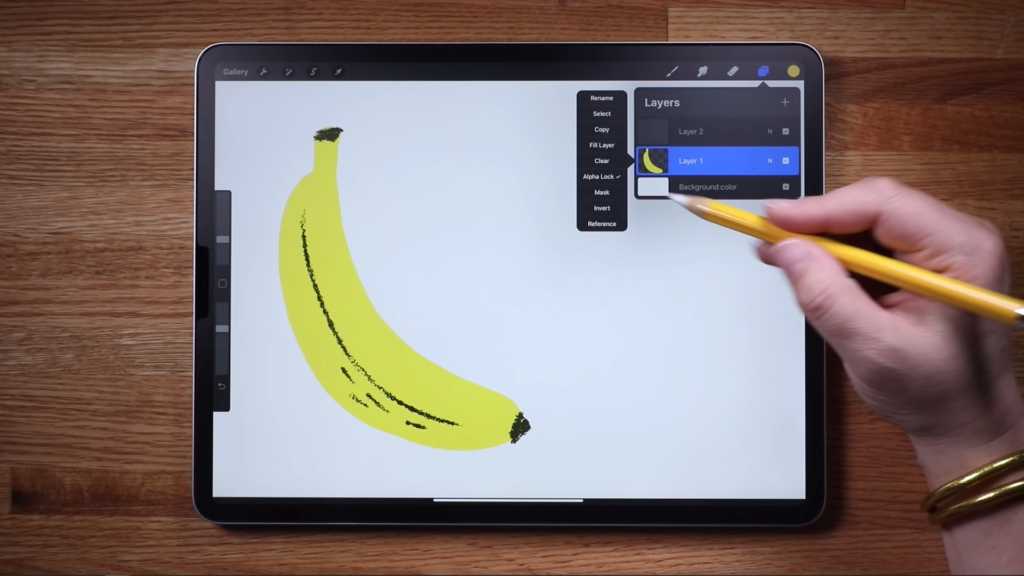
Back to the layers panel. Tap the layer to access the layers menu. You’ll see several options: rename, select, copy, fill, clear, and more. Tap “clear” so we can start fresh. Let’s select yellow from our palette and draw a banana shape. To fill this area with color quickly, tap the color circle and drag it into the shape.
For the details of the banana, we’re gonna put those on a new layer. Tap “layers” and tap + to create a new layer. Now I’m going to select a blackish-brown and a different brush and draw my details.
Because I’m working on a new layer, I can edit and erase and the banana layer remains unaffected. Tap this checkbox to hide and show layers.
I want to add more texture to this banana. Go to that layer and swipe right with two fingers to enable Alpha Lock. The layer will look like it has a checkerboard pattern behind it. You can also tap and see that alpha lock is enabled. Now when I draw the new color only appears where I’ve already drawn on that layer.
Let’s add a new layer. I’m drawing a half circle shape and erasing a bit off the top to give me nice sharp corners. To do the inner orange sections, I’m going to create a new layer. Tap it and turn on Clipping Mask. This is a function similar to Alpha Lock where what I draw will only appear within the confines of the art on the layer below.
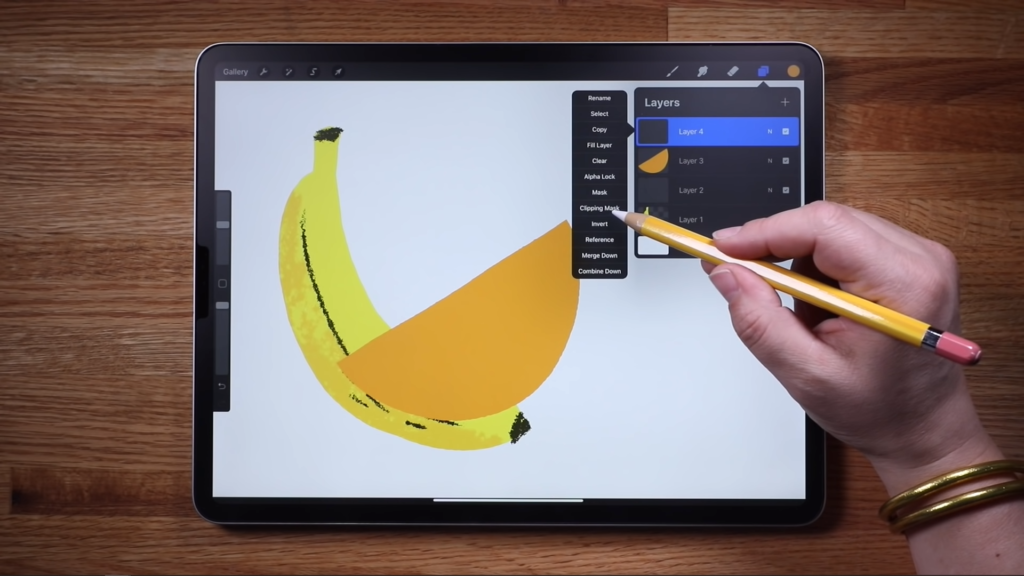
But this time I can draw in a new layer. I can even turn on Alpha Lock on that layer and add texture and details.
Select multiple layers by swiping right with one finger on each layer. Reorder layers by tapping, holding, and dragging.
Change the opacity of a layer by tapping the “N” on that layer and adjusting the slider. You can merge layers by pinching them together.
You can also duplicate a layer or delete a layer.
There are a lot more layer options so play around and see what they do.
For a full tutorial on Alpha Lock and Clipping Masks, click here.
Quickline & Quickshape
Here’s another really awesome feature. Can’t draw a straight line to save your life? Have no fear, quickline and quickshape are here! Draw a line, but don’t pick up your pencil. Voila! Perfect line. You can move it around, or put another finger on the canvas to make it snap in 15 degree increments. Tap Edit Shape at the top to edit further.
You can also do ovals or circles, rectangles and squares, triangles, or weird crazy polygons.
The Quick Shape feature also works with arcs too so we’re gonna use that here. And then I’m just gonna add a little bit of texture to those cherries just like we did before with Alpha Lock.
Procreate Selection Tool
Let’s take a look at the selection tool.
It’s the “S” shaped icon in the upper left. Tap it to enable Selection Mode. This menu pops up at the bottom, so I like to zoom the canvas out a bit to see everything. There are several types of selections, but the one I use most often is Freehand.
You can tap, tap, tap to make a polygon selection or just draw a selection shape freehand.
You also have the option to feather or soften the selection edges and clear the selection. You can make rectangle selections, and ellipse selections.
Procreate Transform Tool
Okay, now I’m going to show you the transform tool.
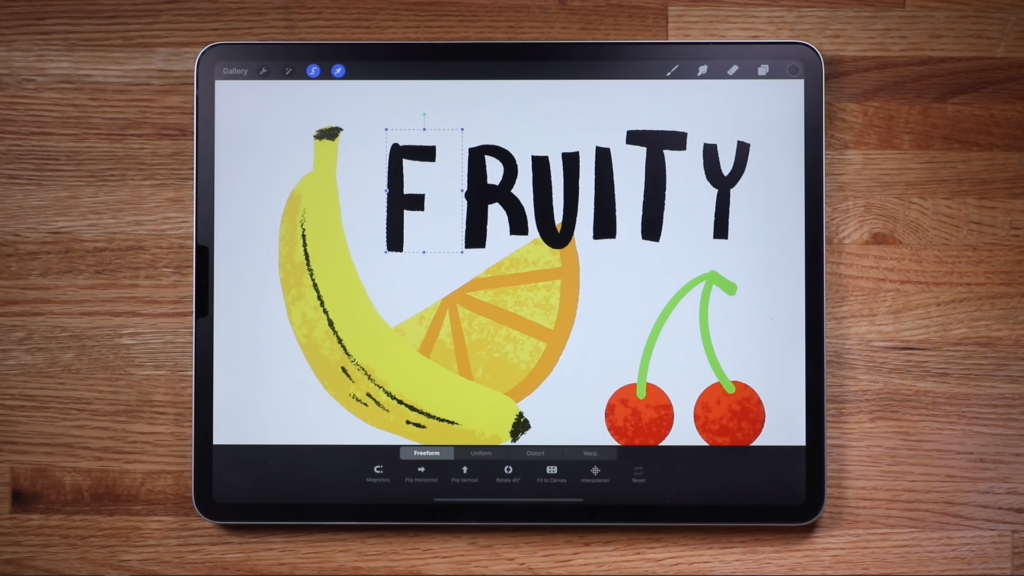
I’m gonna first select the F and then tap the arrow to access the transform tool. This is what you use to move elements around the canvas. You can use the options at the bottom to flip, rotate, you can also grab this little green handle and rotate.
If you turn the magnetics off you can kind of move freely and you can resize any which way you want. If you have magnetics on you’ll get little guides when you move around, and if you resize, you’ll maintain the uniform shape. Another way to resize objects is by pinching and zooming. And no matter what when you do this, it will always maintain that same size ratio.
If you need to zoom in while in Transform Mode, hold down the arrow icon with one finger and spread out to zoom.
Tap, tap, tap in any direction to nudge your selection pixel-by-pixel.
And we’ll zoom back out. If I tap the transform arrow without making a selection, that’s gonna select the entire contents of that layer.
The distort function allows you to manipulate like this if you drag on the corners, or if you grab the edge, it’ll kind of make a shearing effect, and then there’s also the warp option, which you can really get crazy with. You can even, like, fold over, grab in the middle, and move it around and just get really weird with it.
You can select and transform multiple layers at a time. We’re gonna go ahead and select all of our layers by swiping right on each one and then let’s just make a selection here and you can see we can transform just that part.
If you need to go back and edit your selection, once you’re in transform mode, tap and hold the selection icon.
Adjustments Menu
Let’s now look at the Adjustments menu, which is the little magic wand icon.
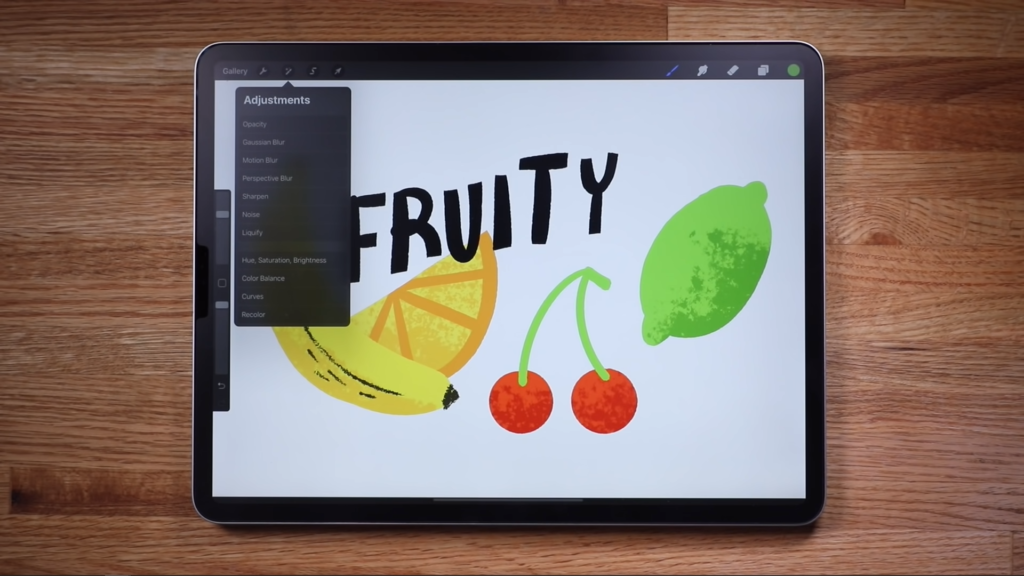
I would take some time to go through and see what each option does. Let’s look at the Blur tool. Slide your pencil across the screen to increase the amount of blur. As you can see, the blur is only happening within the confines of this shape. That’s because we have Alpha Lock turned on on that layer. Turn it off and you’ll see it blurs the whole object.
Procreate Liquify
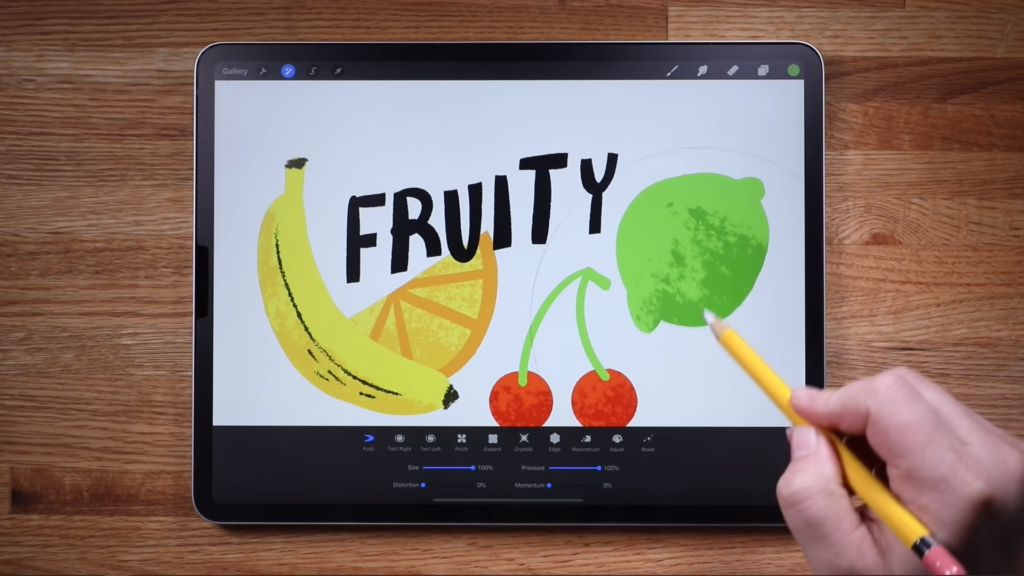
I also want to show you Liquify because this is a really cool feature. I recommend you just play around with each option and setting and get to know what they all do. But as you can see you can push, twirl, pinch, expand, and more until you have no idea what the hell you are even drawing in the first place. Tap reset to get back to the original shape.
Adjusting Colors with HSB in Procreate
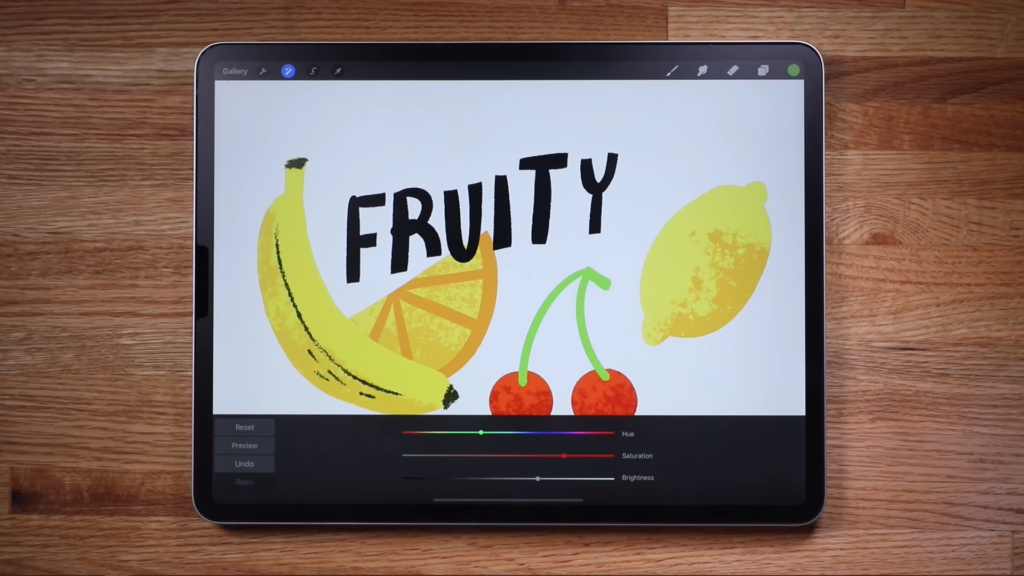
Hue Saturation and Brightness is something I use a lot. Use the sliders to adjust the color, saturation, and brightness. And we can turn this lime into a lemon.
Tracing from a Reference Photo
The last menu I’d like to show you is the Actions menu.
It’s the first icon in the toolbar and it looks like a wrench. Tap add and then insert a photo.
Bring up your camera roll and let’s choose this picture of a strawberry that I saved. We’re gonna resize it.
And then we’re gonna add a new layer. This is really handy because you can take a photo and just trace over it and then just turn off the layer with the photo.
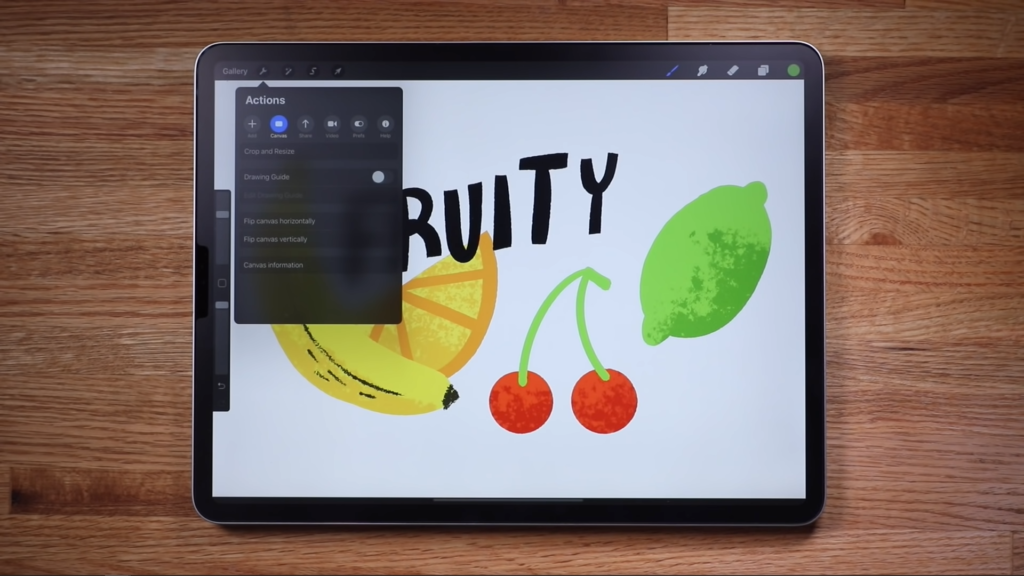
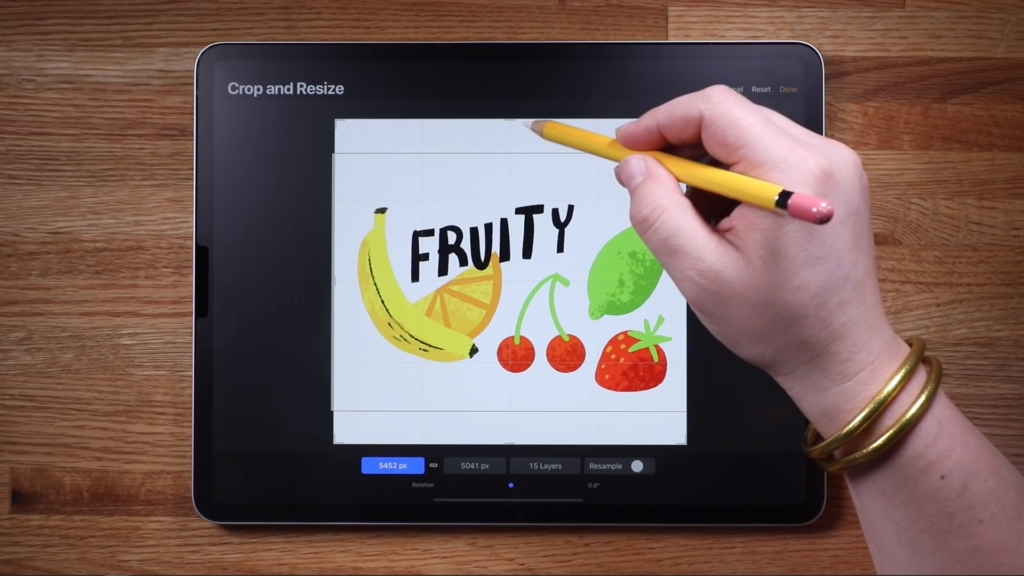
Crop and Resize
Next is Canvas and one useful tool is Crop and Resize that allows you to change the shape and size of your canvas.
Drawing Guides and Symmetry
Drawing guides can be really useful and fun.
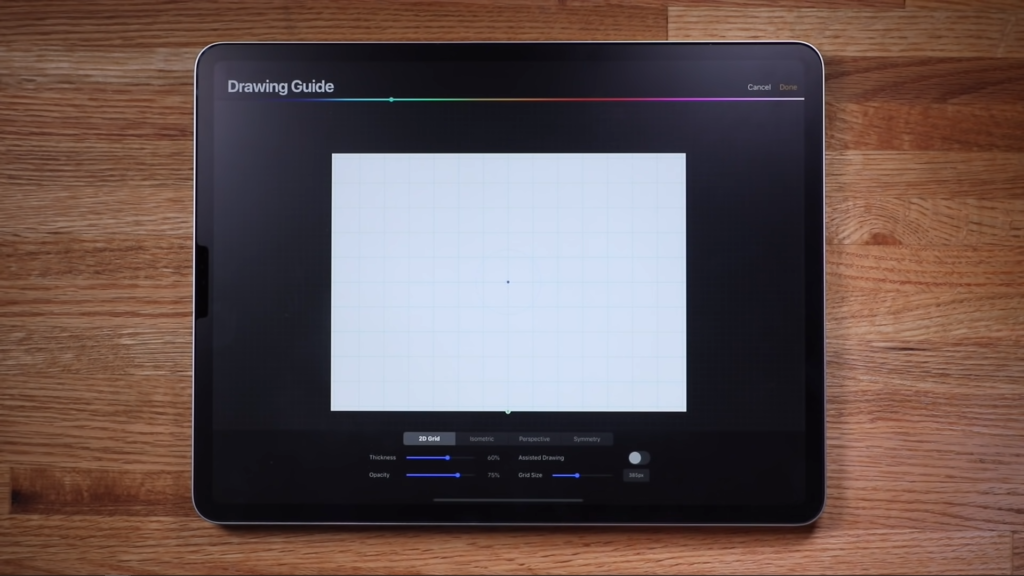
To show you this feature, let’s quickly create a new canvas. Turn on the Drawing Guide and tap Edit Drawing Guide. There are a few different guides like a 2d grid, isometric grid, a perspective guide, and one that is super fun, which is the symmetry feature. Tap Symmetry and then tap Radial and then make sure Assisted Drawing is on, and then tap Done. Now just draw. It’s actually pretty therapeutic to spend time just kind of doodling this way and having fun.
For a tutorial on drawing guides, click here.
Time-Lapse Replay in Procreate
Tap Video under the Action menu. One of my favorite things about Procreate is the ability to play back everything you’ve done in a time-lapse replay. It’s really satisfying to watch the whole process. You can even export your time-lapse video to share or post.

And then there’s a whole load of preferences that you can customize to your liking.
Sharing Your Art
Finally let’s tap Share. You can share your artwork in a variety of formats.
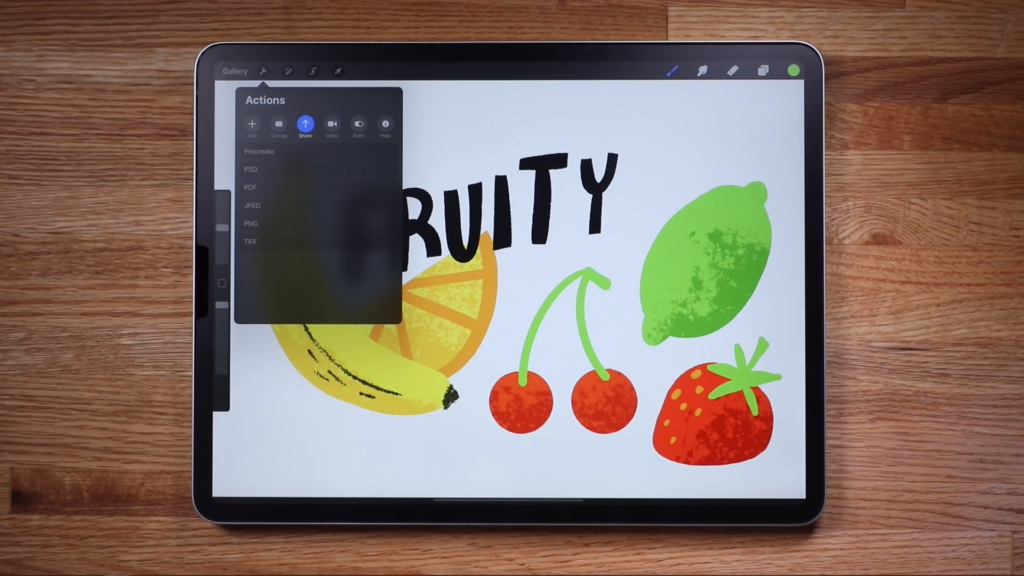
The two I use most are PSD and JPEG. PSD is a Photoshop-compatible format that maintains your layers. It’s great if you need to finish up a piece on your computer.
But the one you’ll probably use most often is JPEG. Tap that and you can save the file to your device, or share it in a number of ways.
Organizing Files in Procreate
Now that we’re all done learning about the canvas interface, tap gallery to exit back to the gallery view.
I think it’s always a good idea to give your pieces a name, so let’s call this one “Fruity”. Just tap the title, and type it in.
Swipe left on a thumbnail to access the same sharing options. You can also duplicate a file or delete it. You can reorder your files and organize them by grouping them into stacks. Tap “Select” at the top, then select the files you want to group, and tap “Stack”. You can rename your stack as well. Let’s call this one “Learning Procreate”.
Resources
Making Art Everyday // A series of drawing prompts, tutorials, and motivation to help you overcome creative fears and establish a daily art-making practice.
I Don’t Know What to Draw // Not sure what to draw? Get a random, possibly absurd idea!
Shop Bardot Brush for High-quality Procreate brushes that inspire you to create.
Procreate Community : Learn // Draw // Share // Join the Facebook Group
Hardware & Software
Here’s what I use // The iPad Pro 12.9” and the Apple Pencil (Gen.2) with a Matte Screen Protector.
A more budget conscious choice // iPad 9.7” (early 2018) with Apple Pencil (Gen.1) and Screen Protector.
And of course the PROCREATE APP! // At only $9.99 USD, Procreate is a STEAL! It’s the best 10 bucks you’ll ever spend.
*Some of the links above are affiliate links, meaning I get small percentage of the sale if you make a purchase. Not, much, but enough to buy a donut at the place down the street. They are like, super good donuts, so you’d really be making my day like a hundred times better. ‘Cause donuts.
Categories: Procreate Tutorial
Tags: Built-In Procreate Brushes
Have you used the iCarez protector listed as a rec for the iPad 9.7”? I’m wondering how it compares to the Klearlook Matte Screen Protector or Paperlike 2.
Thanks
Can you help with this? My 10 year old wants to know how to do ”Mandala” type drawing with procreate. Do you have a video ?
This was a fantastic intro into Procreate! Thank you, I’m now looking forward to experimenting with it!
This blog is a fantastic Guide to Procreate! Thank you,
I’m looking at creating Mandala with procreate
Tx
Manny Acharya